Thursday, 27 March 2014
Final Titles and Opening Scene
My groups final titles is embedded above. My group member Amy had an acting role in the final project, Beth was incharge of filming and camerawork and I had a directing/producing role. All three of us worked on editing the project on Final Cut.
Thursday, 20 March 2014
Editing - Stage Three
At the last stage of editing, we added titles and made small make sure our project was of the best quality. For our credits we chose to use a simple yet bold font that was conventional to the horror genre. There are some screen shots below of adding titles to our project.


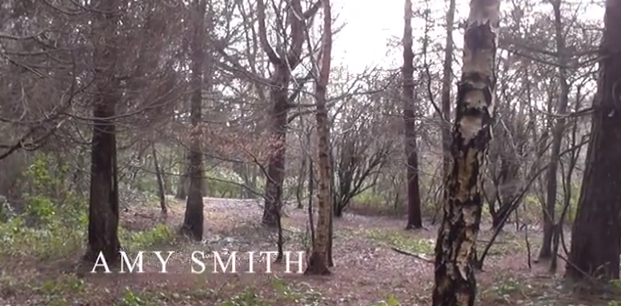
This screen grab denotes how the the titles we chose fade in and out on screen. We chose to have the titles white as the colour can be easily associated with ghosts, connoting that death is a theme in our film. Also, a white font looked best with our footage as it stood out but wasn't too overpowering. The soft fade in and out of the titles doesn't take the attention away from the film itself.
On the left is a full screen shot of our titles from our final project. This image shows how they are placed on the screen and highlights the composition of the text.
This part of the editing process was key as it gave my group to make sure our project was completed well and pick up on any minor errors and aspects of our project that might have needed correcting. Adding the titles was also important as we had to make sure our titles linked to the conventions in our genre.
We decided that the titles that best fit our project was 'Feature' in Final Cut. What we liked about this title was that it subtly faded in and out connoting a mysterious atmosphere for viewers. We chose to keep the titles capitalised as this is conventional of opening titles.
In this image we were experimenting with the placement of the titles on top of the clip.This screen grab denotes how the the titles we chose fade in and out on screen. We chose to have the titles white as the colour can be easily associated with ghosts, connoting that death is a theme in our film. Also, a white font looked best with our footage as it stood out but wasn't too overpowering. The soft fade in and out of the titles doesn't take the attention away from the film itself.
On the left is a full screen shot of our titles from our final project. This image shows how they are placed on the screen and highlights the composition of the text.
This part of the editing process was key as it gave my group to make sure our project was completed well and pick up on any minor errors and aspects of our project that might have needed correcting. Adding the titles was also important as we had to make sure our titles linked to the conventions in our genre.
Wednesday, 19 March 2014
Editing - Stage Two
Having edited most of our footage we decided to include copy right free sound effects and soundtracks to our film project. We wanted to add sound to our project to create a scary/suspenseful mood, using sound in this way is a key convention in horror opening sequences and films. The sound effects used are from the website SoundCrate, which is shown in a screenshot below.

Here is a screen grab of the music we added to our film project.We had to trim the clip in some sections and split it to make it match the actions in the film and to build suspense at the right time.

This editing process was key in our project because it allowed my group to realise which music and sound effects were best suited to our film, and genre. The sound will have a large impact on our final video as it will help create an appealing and entertaining film that draws viewers in and creates a mood.
Here is a screen grab of the music we added to our film project.We had to trim the clip in some sections and split it to make it match the actions in the film and to build suspense at the right time.
This editing process was key in our project because it allowed my group to realise which music and sound effects were best suited to our film, and genre. The sound will have a large impact on our final video as it will help create an appealing and entertaining film that draws viewers in and creates a mood.
Tuesday, 18 March 2014
Editing - Stage One
In today's lesson we started editing our film footage as a group, so far we have put a few shots into Final Cut and we have started cutting off excess parts of the clips that are unneeded or excess. Below are the screen shots of some of the editing stages in Final Cut.
1. First we uploaded footage into Final Cut, ensuring it is in chronological order and follows our storyboard

2. Then we chose where parts of the clips need to be cut off and are unneeded. We used the cut/split clip tool to do so
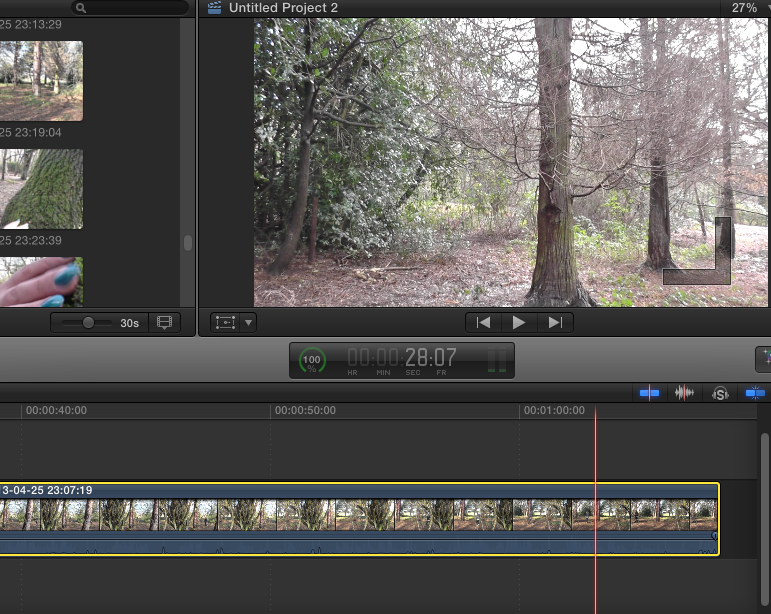
3. Having chose the unneeded clips we cut them out of our film reel

This proccess is a key stage in creating our final titles sequence, editing the clips in order and altering sound etc is very important. Also, this process allowed us to apply our editing knowledge like match on action and shot reverse shot as well as other skills.
Monday, 17 March 2014
Behind The Scenes Filming Shots
Below I've embedded some pictures of my group filming our final project in Bentley Priory park,using a PhotoSnack slideshow. My group member Beth has the role of filming, Amy is the main actress in our project and I'm the director in the images.
Thursday, 13 March 2014
Pre-filming activity
Canted angle test footage
As a group we decided to try out one of our filming shots prior to going out and filming because we thought it would be useful to run through shots to make the filming process easier. We decided to trial a canted angle from floor level because we thought it would be a good shot to use in our final project to help introduced our main character on screen, a convention of opening titles and scenes. Also, in a woods filming setting it could be difficult to film this on a forest floor. So, we did a run through to make sure we can easily film this shot type in our film setting.
Editing
In Final cut we tried applying filters onto the footage to make the lighting darker. We wanted to alter lighting as it's conventional for horror films to have dark/gloomy lighting to create an eerie and thrilling atmosphere for viewers.
One of the filters experimented with was called 'Isolate' in Final Cut. What was good about this filter was it made the footage slightly darker lit (I've uploaded a screen shot of the footage before and after applying the filter below). The change in lighting was conventional of the horror genre and overall creates a good effect. This could be a good filter to apply to our final film project to create a scary mood for audiences.


This effect could be good to use if it's raining on the day we film as it will make the footage seem suited to the filming surroundings and help make the shot look realistic to our film environment. The filter also focuses on Beth's shoes when she's walk making the shot successful as she's the main focus.
We also tried out using some audio filters to make the sound of her walking more prominent in the clip. After listening to the sound filters 'Cathedral' and 'Delay Designer' we chose to use the latter audio effect to enhance the natural sounds of birds and Beth's footsteps, as it will draw focus on her entrance in the footage. This audio filter good be good to use in our final project.

Edited test footage
Editing
In Final cut we tried applying filters onto the footage to make the lighting darker. We wanted to alter lighting as it's conventional for horror films to have dark/gloomy lighting to create an eerie and thrilling atmosphere for viewers.
One of the filters experimented with was called 'Isolate' in Final Cut. What was good about this filter was it made the footage slightly darker lit (I've uploaded a screen shot of the footage before and after applying the filter below). The change in lighting was conventional of the horror genre and overall creates a good effect. This could be a good filter to apply to our final film project to create a scary mood for audiences.
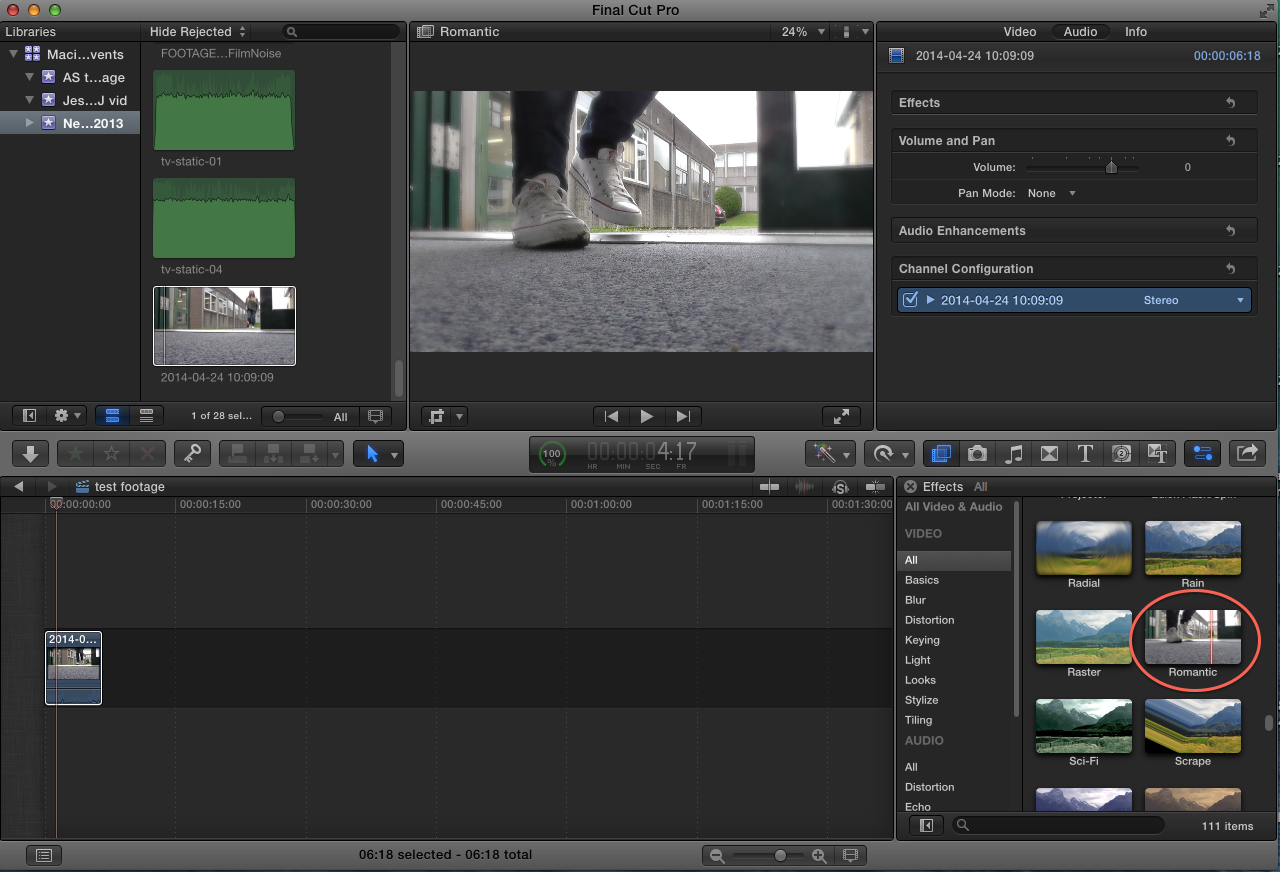
Another filter that we liked in Final Cut was called 'Romantic', it added a slightly hazy effect to the shot.
This effect could be good to use if it's raining on the day we film as it will make the footage seem suited to the filming surroundings and help make the shot look realistic to our film environment. The filter also focuses on Beth's shoes when she's walk making the shot successful as she's the main focus.
We also tried out using some audio filters to make the sound of her walking more prominent in the clip. After listening to the sound filters 'Cathedral' and 'Delay Designer' we chose to use the latter audio effect to enhance the natural sounds of birds and Beth's footsteps, as it will draw focus on her entrance in the footage. This audio filter good be good to use in our final project.
Edited test footage
Friday, 7 March 2014
Health and Safety Form
Below I've attached a health and safety form, related to the risks and hazards whilst filming our final project. I have created this health and safety form and I've embedded it onto my blog by using SlideShare. Going through this form is very important for my group before we film as it will make us aware of the risks and dangers we should be cautious of and avoid whilst filming. Reading through this form will also decrease the chances of accidents as my group members and I will be more aware of our actions and surroundings.
Wednesday, 5 March 2014
Opening titles and scene storyboard
Here are images of the storyboard I have illustrated for our opening titles and scene, attached in the form of a flipbook created on the website Flipsnack, as a group we discussed and planned what each scene in the opening sequence would have in it. Creating a storyboard prior to filming is a good way for my group to get down our ideas and envision how our ideas will look on screen systematically. Story boarding is a key step in creating our final project as it lets us plan how we will film our project and allows us to be aware of the camera shots, sounds and length of our shots. Also, the story board for our final project acts as a guideline for my group to follow when filming the final project making the overall filming process more organised, preventing us from wasting time.
Shot List
Below is a shortlist my group member Amy has created for our opening sequence.
Shotlist template. from isthatamythough
A shot list is important to create prior to filming as it helps my group plan which camera angles and shots we want to use in our final project. It gave my group a chance to carefully consider the variety of shots we wanted to use in our titles and opening scene.
A shot list is important to create prior to filming as it helps my group plan which camera angles and shots we want to use in our final project. It gave my group a chance to carefully consider the variety of shots we wanted to use in our titles and opening scene.
Subscribe to:
Posts (Atom)